Tag Archives: source: online tutorial via Pinterest

Pictures or it didn’t happen–Project 30

Standard
Pictures or it didn’t happen–Project 30

I’m still deep in the middle of a writing project I thought would be done by now.

But here’s pictures of my gradient painted chest — it’s got some imperfections (NATURALLY) but I. Love. It.

I now want to get some other stuff painted before it gets too cold. So here goes….

The pink version that was Just Not Me.

Front view.

But I really liked those colors played off the glossy grays and black.

Still some pink, but much more me.

The sides of the drawers show off a bit more of the imperfections of the finished piece. The top drawer is much lighter because I forgot my plan to paint the sides all with the unblended burgundy, then I painted it over with another coat of burgundy. Since it’s not going to be on display in its opened state, really no one’s going to see it who doesn’t already know. And let’s just say I am rather disinclined to mess with paintbrushes again when spray paint is so much fun.

Right in the chest

Standard

I made it through most of the frame and 2 drawer-fronts on the chest of drawers before I didn’t feel I had enough light to continue. (And oxygen was an issue.) I probably won’t know until I can haul them out of the garage into daylight to get a good look whether or not the coverage is good enough to do it in one coat, but it looks good at this point. I hope so! I really need gloves and a mask to do any more of that. (Stupid not to in the first place.)

I have one drawer-front left and the rest of the frame, where I ran out of flat black paint.

I think the gray/pink and black/burgundy of the front/sides are going to look kind of cool together, when the drawers are open.

Now I’m off to continue writing a story I’ve been working on. Deadline is Sunday, and my Saturday and Sunday are kind of packed.

Hm. I want some ice cream, but I don’t want to have to go out to buy it. :(

Craftus Interruptus cured!

Standard

Okay, so I’m back from vacation and before that, from my usual pre-vacation frenzy. In fact, the PVF was so frenzied that I got my craft done but didn’t have time to fool around with pictures or posting.

Here’s a simple jewelry DIY I’ve seen around Pinterest.

Denim, wire & beads

The main thing that surprised me on this one was the fact that it’s the vertical seams you use on this piece rather than the hems. Which is good, since I had been thinking “but my hems have gotten all ratty and worn out!”

And since my favorite jeans which I’d dyed turquoise about 6 months ago to extend their life have finally sprouted a hole near the crotch, expect to see some other recycled jeans crafts around here.

Source for denim bracelet tutorial: The site’s in Chinese, but the tutorial’s all pictures. http://www.duitang.com/people/mblog/15856615/detail/

It was on Pinterest, so it must be a craft; Project 27

Standard
It was on Pinterest, so it must be a craft; Project 27

I must now confess to my terrible habit of divesting myself of socks and … ahem, such … and leaving them in little sock balls on the bathroom floor. So I perked up when I saw an incredibly simple DIY on Pinterest. It was so simple, in fact, that I don’t even think I pinned it.

Someone had taken a large embroidery hoop and attached it to a long pillowcase (a king? a body pillow? Not sure) and then hung it on the wall. I already had a big embroidery hoop (which I’d just barely avoided ruining some jeans with when I started to do a bleach pen craft on my lap but stopped myself just in time) that I’d bought at a thrift shop. A few days later, I’m checking out the flea market where I have my stuff, and there’s a whole rack of old cloth feed sacks from somebody’s farm. And my brain actually makes the connection on the spot.

If you’ll look close, you’ll see the Archer representing Archer Daniels Midland (a name I cannot help hearing in my head in the NPR-guy’s voice. Their slogan refuses to come to mind, but that’s totally okay with me).

Hung it on the bathroom wall with a nail, and there you go. Craft. Done.

I went back and got a few more of the feed sacks, in slightly less awesome condition because they were selling like crazy and the farmer was down to his last few. They washed up pretty well, though not perfectly, so I will be doing something or other with them — maybe tote bags, maybe something else.

Life’s a bleach and then you dye; project 24

Standard
Life’s a bleach and then you dye; project 24

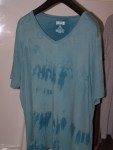
I was feeling a bit rocky physically over the weekend (and still am), so my belated craft is a fairly simple one. I’ve been seeing some Pinterest pins on tie-“dyeing” with bleach, so I thought that would be a good choice for yet another shirt that had been rack-wrecked with an ill-placed drip of salad dressing. I’d been putting off doing this shirt, because it was pretty much brand new, and I love the color so much, and I didn’t want to do something that would render it completely unwearable.

I loved the way using rubber bands and little glass whats-its made such intricate medallion-like patterns on the silk scarves I dyed a while back, so I placed 5 around the V-neck in the front of the shirt. Following the gathers that made, I pinched the fabric in folds all the way down the front of the shirt, from the center on out. I had a couple of binder clips at hand, so I fastened them that way, just in a couple of spots.

I thought it would be cool to leave the back unbleached, so I put some bubble-wrap between the front and the back. (When I’m painting or using a bleach pen, I usually use a cereal box, but I was afraid some of the color would leach from the box onto the shirt with this one, so I went with the bubble wrap).

Here it is ready to dip into the bleach solution:

I really need to clear an actual crafting surface to work on. Really.

The bleaching directions I got from this DIY project (found via Pinterest): http://honestlywtf.com/diy/diy-bleach-tie-dye/ (And boy, do I want to do a shirt like the one done here!)

And my advice if you use this method to do a shirt, pay attention to her suggestions about working outdoors and gloves. I was Miss Half-Ass-It, and it wasn’t that pleasant. And the fumes could be seriously not good — I used the exhaust fan in my bathroom as I worked, but it still was headachy.

The two things I think I’d do differently (besides working outdoors and wearing gloves): use a bigger vessel for the solution and clip the pleats all the way along their length. As for the first, I used the bathroom sink, a smallish oval, so I had to keep moving the shirt back and forth to be sure everything got in the bleach. When I checked for color, the back hem got into the bleach too, so I didn’t end up with the full unbleached effect on the back. This shirt was dip-and-check-dip-and-check, rather than the 30-minute resting period of the bleach pen. I couldn’t say exactly how long it was in the bleach solution, but barely over a minute or two. I rinsed it, pulled out the clips and glass bits, then ran it through the wash.

Here’s the front, once dried:

Bleach tie-dye

I’m a little disappointed by the medallions, which are just kind of quavery little rounded boxes. They may need some sort of embellishment. The resist effect only was clear where I had the clips in. I’d do it all the way down another time, but I still think this came out okay.

Jury’s still out on whether I feel there should be more embellishment of some kind on the front.

And here’s the back:

Looks cool, especially close up, but someone walking behind me down the hall at work yesterday thought I’d fallen into a puddle or something.

I learned a few things from this, and got a wearable shirt out of the deal, so it’s pretty much a success.

Raclette, meet rack

Standard
Raclette, meet rack

Last winter I discovered raclette, the absolute perfect food. Potatoes, melted butter, melted cheese. What’s not to love?

Ah, that. The pure liquid fat dripping off the fork and right onto my chest. And the plain t-shirt I was wearing for the first time. Raclette, just like salad dressing, likes big busts and it cannot lie.

Solid color tees, so great because they go with everything, are always the most endangered item in my closet. If they make it past a third wearing without being consigned to the pile of formerly wearable at work clothing, it’s a minor (and temporary) miracle.

My Pinterest board titled “T-shirt Renovations” is chock full of ideas for t-shirt fixes, so I thought I would share some of my attempts to rescue splattered tees.

The first one I did quite a while ago, shortly after the Raclette Incident. I found a perfect stencil in a pack I had bought, using my oil paint Shiva Sticks. The bigger circle in the center is right where the raclette spot was. It filled in nicely (though the iridescent charcoal and silver paints came out looking pretty matte black and grey on the cotton jersey).

Hit me with your Shiva stick, hit me, hit me!

Until it went through the wash. Then the paint over the grease spot faded out. I started drawing it in with a Sharpie in a moment of boredom, but I figured that might not end well. I have had some thoughts on how to deal with that center bit, but it involves a little something I have lost track of and I didn’t want to go buy another (and the hardware stores are closed on Sunday anyway). It’ll make a return engagement when I find the missing piece and get the project done.

Just recently I saw a P.S. — I made this! post about spraypainting a top through a yard or so of lace. So happens I bought 2 lace curtains at a Goodwill recently for under $5 total, so I cut one of the panels and spraypainted copper fabric paint onto this brown tee. The result is so subtle in person that the lace effect is pretty lost, but it looks like the stain was taken care of.

Um, well.

Neither thing appears to be true in this photo. Haven’t decided if it needs something further, or if I should just wear it as is. Since it’ll be 97 degrees F tomorrow and this has long sleeves, I have some time to think.

I also have a big piece of painted lace to use on some project.

I have some thoughts on that, too.

This last picture is the t-shirt rescue I like best. I’ve seen this one on Pinterest too. You make a design with the Chlorox pen on a colored shirt, let it rest 30 minutes, then wash. I freehanded the design, based on one of my favorite ZenTangle designs, the henna drum. I simplified it way down because the fine point of the double sided bleach pen is still pretty wide — it’s for stain treatment and not drawing, after all. There’s bleed, but I still love how it came out.

Life’s a bleach and then you dye.

I’m really looking forward to wearing this one.

Scarf by a Thousand Cuts: Project 15

Standard
Scarf by a Thousand Cuts: Project 15

It’s been a bit of a busy weekend. I ran a ton of errands Saturday morning in a string from home to Milwaukee, where I stayed with my friend Saturday and then went to the Bel Canto Chorus performance of Dvorak’s “Stabat Mater.” Which brought up tons of thoughts about creativity, and tied in with other thoughts about creativity I had been having, and I’m hoping to get them all into a post which makes some sense. Which is damn inconveniently timed, considering I also have a ton of things to finish getting ready for my art show booth. But I’ll do my best to do that soon.

So this week’s craft isn’t actually a “finished it at the last minute” piece — it’s been ready for a while but I haven’t had time to sit and write about it. It continues the theme of hacking up tee shirts, only from a perpendicular perspective. It’s another Pinterest-inspired project, which I found here:

http://psimadethis.com/post/117053343

The P.S. I Made This blog is pretty cool, by the way. It takes a lot of designer looks and shows interpretations of them that can be pulled off for much less (or nothing) using recycled items or stuff you already have around.

So I had one of the two print tees I’d bought at the Mart of Wal, one which got made into several necklaces and bracelets last week, after being tossed into a dye bath. This time I didn’t over dye the print, just used it as is. Cut it so it was a tube shape, cut the strips, pulled them (and despite what I’d read somewhere, they do curl up the same whether you cut jersey with or against the grain). And I’d stumbled onto some pretty little shell danglies at Jo-Ann Fabric, so I decided to sew one on every third fringie. I wanted the scarf to stay print-side out, so I folded the intact part of the tube inward and put a couple of stitches at four different places about an equal distance apart.

Simple, cute.

The really daring, I suppose, could wear it as a skirt.

And a close up of my own variation:

A closer look at the shell embellishments I sewed on.

This one will be for sale at the Wiscon art show.

‘kay, it’s been a long day, so no brilliant posts of theorizing or anything. I hope y’all have great plans for the holiday weekend (those of you who will be having a holiday weekend…) Do something creative, yeah?

“MY GOD, IT’S FULL OF STARS”

Standard
“MY GOD, IT’S FULL OF STARS”

By the time this year is more than halfway through, I suspect the most-used tag will be Fixes for t-shirts I wrecked by dropping food on my rack.

This is the first. Though it was originally kinda ruined when I got bleach spots on the hip. How that occurred I can’t even tell you, since I don’t use bleach in my laundry. It’s a mystery. I was wearing it anyway under a cardigan, but then I dropped something on my rack (it’s always salad dressing or something that won’t quietly disappear in the wash — someone needs to write a scientific paper on the attraction of oily foods to the sizable rack).

So I found a tutorial through Pinterest where that begins with you spritzing bleach all over a black cotton tee, so it seemed like a natural. Plus, it looks really amazing.

You can find the tutorial here:

http://treasuresandtravels.squarespace.com/blog/2012/2/21/diy-galaxy-tee.html

So here’s the shirt I started out with — a nice basic tee that I wasn’t nearly ready to part with yet. Except — crap! Grease stain!

Out, damned spot!

I sprayed the shirt with bleach, and then promptly tossed it in the washer. But here it is, post-spritz.

I love the fine spray of reddish color here.

I dotted around several colors: smudges of matte gray and some iridescent blue and red, using my Shiva oil paint sticks.

Point down, and a little twist of the wrist

Then I smeared around some white glitter paint throughout. The original tutorial used white paint and glitter separately, but I went with what I could find at the megalomart on the way home from work, which has a good fabric section and a crappier crafts section. I wore this once, then decided it needed more glitter. Though I wore it again, I suspect I’ll add some spots of paint by thumb-flicking paint-loaded bristles, rather than flicking the whole brush a la Pollock.

But here is its current form:

Pretty slick, huh?

Though I’m very nervous about it, I’m wanting to try this on a canvas tote, with some handwritten text in a resist medium before I bleach. I think it would make a very cool item for the Wiscon art show — which, HEY, I GOT ACCEPTED!!!

Cry Havoc and Let Slip the Dogs of Warhol

Standard
Cry Havoc and Let Slip the Dogs of Warhol

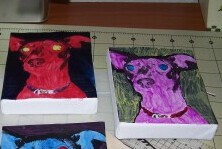
So yes, a perfect gift for my future sister-in-law. It finally clicked a day or two after I found this great tutorial on painting faux-Warhol portraits, hand painted instead of silk screened:

http://cathiefilian.blogspot.com/2009/02/make-it-artwork-la-warhol.html

Future SIL has a dog that she is just mad about, and the rest of the family finds Zoe adorable too. (And Zoe and my brother are nuts about each other, aww.) So I got my brother to email me some pictures of her, and he informed me that Zoe’s mama particularly loves pictures of her with her ears cocked forward.

This project definitely strayed into I-cut-out-my-own-leaf territory (see my post on second grade art, “The Darkest Depths of Mordor”), both intentionally and unintentionally. My main departure from Cathie’s project is that I chose smaller canvases — a 2-ft. by 2-ft. commitment seems to be a lot to ask of another person’s decor. Plus I had four 5-in. by 4-in. canvases, which adds up to a much more reasonable 8 x 10. Most other departures were accidental. They made a difference, too, but I ended up liking this project a LOT anyway.

For one thing, I had trouble printing out the photo onto actual photo paper (I was too impatient to go through all the figuring out of settings and that, or to waste any more photo paper.), so instead of photocopying a print, I just printed out four originals onto regular paper. I don’t know if that affected my results or not.

It will surprise none of you who read my tale of second grade impetuousness that I JUST NOW discovered I used the wrong kind of brush in painting over the pictures once they were Mod Podged onto the canvas. The materials list says foam brushes, which I totally missed. ::forehead smack:: So there are brushstrokes I could not make go away. (I think they look a little worse in the photos than in person, but some colors were definitely streakier than others. And I wonder if the dark background made those parts tend toward streakiness anyway because of the ink coverage.) They don’t look exactly Warhol like, but I do think they look cool.

Zoe in progress

I decided to dab on a little iridescent gold paint onto the buckle of Zoe’s collar in each print, which gave me the brainstorm of using the same paint (Shiva Sticks oil paint crayons) around the canvas edges. This is a case in which I intentionally made it imperfect, drawing it across the edges and then smudging it into the canvas with my fingers. The two or three times I got a little streak of gold on the edge of the image itself, I left it there. It goes with the streaky look of the painting, and adds an energy to the piece, I think. Anyway, that’s my story and I’m sticking to it. After that, a few coats of varnish for acrylic and oil, and done!

Zoe x 4.

Like I said, it didn’t come out just like the tutorial (which looks pretty awesome), but I still like the result. Just for the hell of it I’ll have to try doing a canvas with the foam brush and see the difference that makes. And maybe next time read a little more closely when I’m diving into a tutorial project….